
Dauntless’ Ostian Repeaters are a Support Player’s Dream
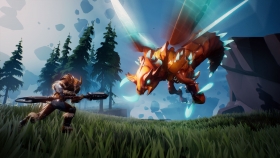
The giant creature stalking game Dauntless has been out for a while now - not as a full release, which came fairly recently, but as a beta so if you’ve wanted to check it out you probably have done. In case you haven’t: you grab your oversized weapon and head off to one of several islands floating in the air. Once there, you locate a Behemoth and kill it until it’s dead.
One of said weapons are the Ostian Repeaters, which were the first true long-range weapon introduced to the game. A couple of the others have long-range elements to them, but at some point you have to get close. Therefore, the Repeaters quickly became my favourite weapon as it’s much easier to dodge attacks when you can see them coming. The game describes them as such: “A pair of modular, aether-powered firearms designed especially for Slayers”. They fire 12 rounds before requiring a reload, though you can reload at any time.
You unlock the Repeaters pretty early on, and as you use them you will unlock the different parts. There are seven Barrel types, which each do different elements of damage. The Chambers enable the following secondary fire abilities:
- Full-Bore which fires a bolt in a line.
- Marksman does the same but with more part damage
- Salvo does area of effect damage.

You also get a thrown ability with the Grip, which are: Captain’s Grip with a buff to increase attack speed by 20%, and Saboteur's Grip to throw an explosive mine.
The final part, Prisms, aren’t required and take more work to unlock and upgrade, but are well worth it when you do. They are:
- Brilliant Prism makes your next attack more powerful after a cooldown.
- Eclipse Prism generates Shadow Orbs which make attacks more powerful if you grab them.
- Glacial Prism makes you drop two ice mines after a dodge.
- Searing Prism makes the 10th hit in a row do more damage.
- Snowdrift Prism makes the last four shots in your magazine do more damage.
- Stoneheart Prism has a chance to generate a shield.
The Repeaters can be powerful in their own right, especially when you unlock mods at various stages. Also, if you manage to get up close to the Behemoth when you reload, it will suck some aether from it to super charge each attack for a short time. What this means for a support player, is being able to dash in, throw a buff or mine, then dodge out while taking shots at the Behemoth. If you play it right, you can be at the periphery of a fight, and let the Behemoth take on the people wielding axes and hammers.

There are only two issues. You cannot run whilst the Repeaters are out of their holsters and your attacks will also be less powerful the further each round needs to travel. Of course, there is a certain distance where it will do full power, and getting even closer makes no change to that.
To help you support others, you can use some of the items you’re allowed to carry in your loadout. Of course, you can only carry a certain amount of each item, usually five of each grenade and two of each pylon. All of them are worth bringing along, but I’ll detail them.
- Barrage grenades are your general use “explosions hurt enemy” throwable.
- Coldsnap grenades do frost damage, ideal for if you’re using the Glacial Prism which does more damage if you’re already doing frost damage.
- Inferno grenades cause fire damage and will set a behemoth on fire for four seconds.
- Concussive grenades cause damage, but can also interrupt a Behemoth’s attack.
- Transfusion grenades create three health orbs, which automatically go to any Slayer nearby who needs health. This doesn’t always work the way you want.
Depending on the enemy, I’ll usually bring Inferno grenades and Transfusion grenades. Your fellow Slayers won’t be set on fire, and it’s an ideal way to heal people in need - just make sure to hit the Behemoth! If I’m against a flame Behemoth, I’ll take Coldsnap grenades instead. Shrikes and Embermanes are vulnerable to Concussive grenades, but timing is everything.
Another good tactic is running in and setting a pylon down. The pylons create a circle, within which the effects are as follows:
- Inspiring pylons give Slayers 25% extra damage
- Ironhide pylons decrease damage by Behemoths by 40%
- Lifespring pylon provides 20 seconds of healing
Obviously, the Inspiring pylons are pretty useless for fast moving Behemoths like Riftstalker or Koshai, as they won’t stay inside the circle long enough for the 25% extra damage to really matter. The Ironhide pylons are best for shoring up a defensive position, providing the other Slayers will stay still. Lifespring pylons are ideal for when you drive off a Behemoth, and too many Slayers need too much health for the aether vent to heal everyone before you go after the beast.

There are tonics that you can bring along, but in my opinion only one is of any use for support - Lifedrain Tonic. It gives health to every Slayer who is near to the Behemoth, when you’re dealing damage to it. It’s not a lot, but under a sustained barrage from you, it can refill health bars. So long as the other Slayers don’t keep getting hit…
This is just how I like to play, however. The Ostian Repeater is far from useless as an attack weapon. I went into a hunt for a Frostback Pangar, one of the stronger “Heroic” level Behemoths, where all four of us were using Repeaters. We managed to take it down with minimal fuss, and I don’t think any of us were knocked down more than once! Sure, we didn’t break many parts (including the tail), but the Pangar is a big one, so it’s difficult to keep people aiming at the same areas.
Hopefully this has let you know why you should be using the Ostian Repeaters in Dauntless. And if you do, why you should be supporting your fellow Slayers a bit more!


COMMENTS