
Monster Hunter World: To Kill An Ancient Leshen (Complete Guide)
So Monster Hunter World has dropped its latest content drop with its The Witcher 3 collaboration. Whilst the Special Assignment isn’t too difficult, the time limited Event Quest is quite the opposite. And since I’ve taken quite a liking to this Leshy, I thought I’d share recommendations and builds to deal with such a sore sight. Do note, this is no walk in the woods and it’s designed to be a multiplayer hunt, along the lines of Extreme Behemoth difficulty in some ways. This article expects that you understand the basics of Monster Hunting and Leshen.
Going from Leshen to Ancient Leshen:
If Groot entered Ultra Instinct Mode
There’s quite a few things but the first is quite literally Ancient Leshen (Leshy) is more aggressive and will have a lot of one shot like moves. In terms of aggression, Leshy’s root attacks are faster and have a pin attack that cannot be freed by yourself and will require fellow hunters assistance (more later). The Jagras attack packs are a lot tougher and Igni stone/emote isn’t as effective (more later). But the most dangerous aspect is how much its murder of Revolture are, akin to a more potent Arch Tempered Vaal Hazak and supernova of a Teostra/Lunastra. If on paper that doesn’t scare you, Leshy will also focus target on a random Hunter and will bypass temporal mantle and Moxie thanks to its attrition attacks.
What to bring: Skills, Items, and Loadouts
Skill wise, Health Boost 3 is recommended for the average player. If you’re comfortable or good with doing Longsword Foresight or blocking (Sword and Shield, Lance, Gunlance, Charge Blade, Tank Heavy Bowgun), Health Boost 2 can be used. And if you’re feeling suicidal, none. Don’t bother with Geralt’s armour if you’re being serious, Igni skill isn’t that good nor will it instantly kill the Jagras like before. Stun resistance is a maybe because the Jagras will actually proc it very easily, especially when you have the dozen pouncing on you like a dog when you return from work. Wide Range is a recommendation, but generally speaking only one Hunter needs it if they’re using something like Sword and Shield or Hunting Horn, or any weapon with fast sheath times (so not Heavy Bowgun). Personally Hunting Horn is my main recommendation, as the Deep Vero can buff for attack and defence as their main skills and can easily play the support role. That said, Sword and Shield (SnS) can bring a different form of utility, more later.
Personally I find Stamina Surge better because of stamina, but for safety I'd swap for another vitality (link)
Aim for sniping head with Amped Discharges, slotting for KO isn't worth damage loss (link)
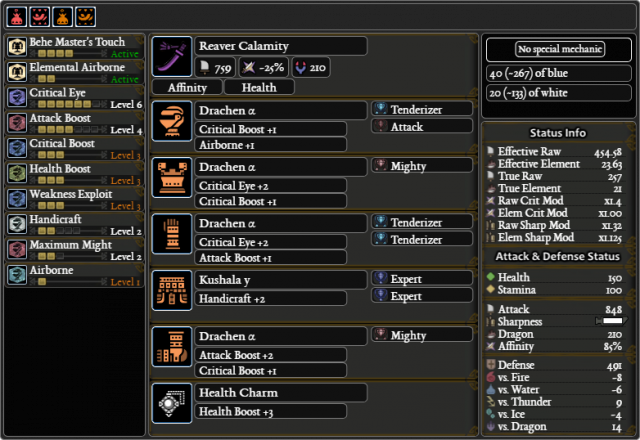
Counter requires more timing to not be caught, if you're brave swap Mighty for Latent Power (link)
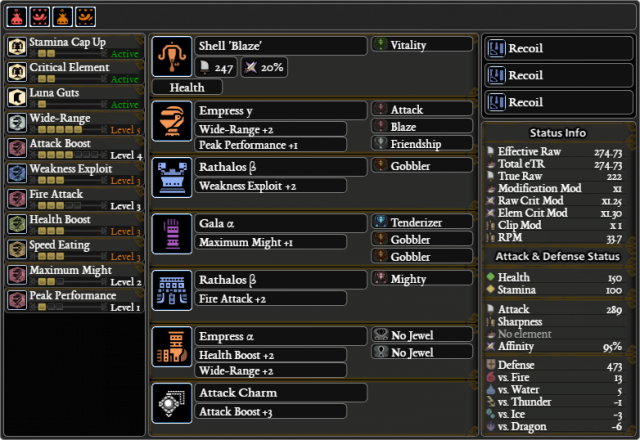
Support oriented gunner set, empty slots for whatever you desire (link)
Can be applied to Ruin SnS, Hammer, and IG, otherwise zero base affinity weapons (link)
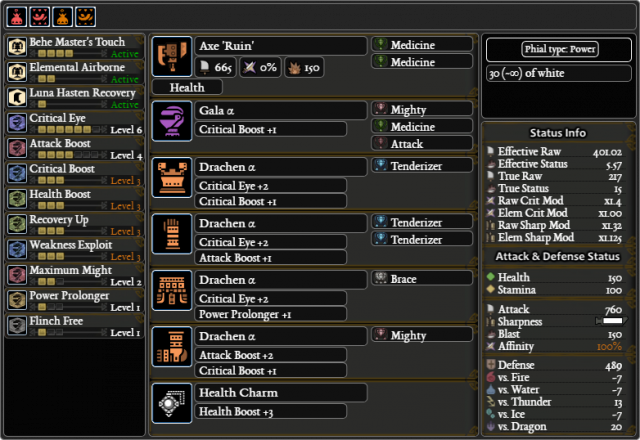
As for general purpose skills, shown above is a cookie cutter set that you can use. Do not slot for Peak Performance as your uptime on it will be none existent if you’re up close and personal as the Revoltures turn you into bird food. And if you didn’t know, Health Augment on the weapon is mandatory, as well as armour defence being above 450 to take the hits. If you’re packing a shield be sure to have Guard Up (mandatory on Heavy Bowgun Tanking) as the root cage will pin you otherwise. Guard 3 is needed even for Lance as the Jagras’s pounce attack will inflict heavy knockback, but for Leshy Guard 1 is more than enough. Guard 5 is just recommended for Heavy Bowgun as is two Shield mods. Don’t bother with bleeding resistance, Leshy only inflicts it on claw attacks and the its bleed rate is very low (if not locked to only attack) and Astera Jerky is more than enough as its a quick use item.
In terms of weapons, each one is viable in their own ways:
- Greatswords are great for the hit and run style and are great for getting mounts (which Leshy is pretty resistant to).
- Longsword can foresight everything, and despite what might be seen/shared, can foresight the root cage. It’s just that the pin will trigger the counter pre-emptively and because the counter’s been engaged, it can ensnare you. Also, because of its wide sweeping attacks, you can make quick work of the Jagras packs.
- Sword and Shield is capable of getting mounts, KOs (potentially), paralysis, and an all-round healer. Also when the Jagras packs attack, flash pod stun and mega barrel bomb them dead quickly. As well as use the Igni emote or flash pods to free caged Hunters.
- Dual Blades have a lot of maneuverability and can keep up with Leshy when it starts teleporting around the map like a discount Goku/Nightcrawler (you can predict where it’ll teleport to by watching where the Revoltures fly/swarm). Also, the new Kjarr Numb is great for crowd control.
- Hammer is basically the Greatsword but for blunt and can KO, albeit not easily. If you’re struggling to get mounts, the upswing can help with that in coordinated groups. As for self sustain, the hammer when geared for healing can heal through quite a few attacks like Greatsword.
- Hunting Horn as stated can buff and play healer, once self improvement is encored your movement is basically SnS speed. Unlike Hammer, you’re less likely to launch players accidentally. Just don’t expect to exhaust Leshy.
- Lance’s charge attack is great to deal with teleports, block attacks, and getting mounts. The icing on the cake is that the up poke can hit Leshy’s head even when it’s standing.
- Gunlance, whilst not super agile, is perfect for smack lancing and shelling playstyles. But what sets it above lance is the fact it can kill wipe the Jagras pack very quickly with Wyvern fire, smack lance, wide shells, and normal bursting.
- Switch Axe in axe mode is disgustingly good for Jagras with its wild swing, and the best part is phial abuse in sword mode when empowered with the corpses activate phial explosions. The only phials I’d recommend are power and paralysis just because crowd control makes the hunt a lot easier.
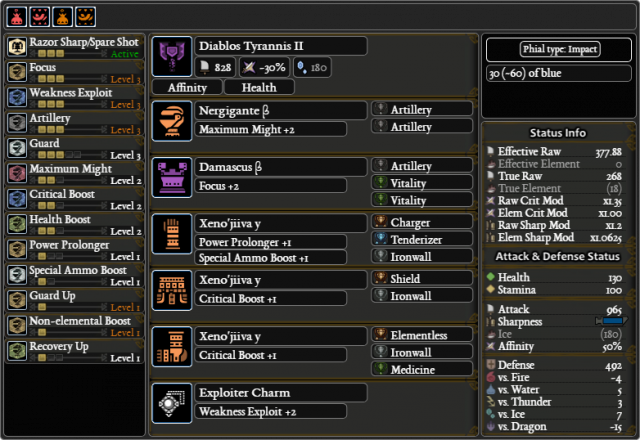
- Charge Blade’s axe mode can easily snipe the head and building for a ultra crit build is recommended. Also, because of Leshy’s high KO threshold and relatively small body, it’s actually better to use Amped Elemental Discharge. If you have Kjarr King (that’s actually amazing for Jagras killing), the non-KT variant is okay but you’re better off using Diablos’ Diablos Tyrannis II because of the KO potential. Oh, and Magazine Jewel isn’t required thanks to its small body.
- Insect Glaive is a great support weapon. The Kinsect can bring poison, paralysis, or heal clouds as supporting damage. It also can aerial dodge its root attacks, get mounts, and general ability to quickly reposition. If you have the Kjarr or Taroth Glaive "Paralysis" that is honestly the best in slot for Leshy, otherwise it’s the typical raw or possibly fire aerial elemental crit (no I’m not memeing it’s actually useable because you want to mount it and its head is its weak spot). Just remember to not let your stamina kill you.
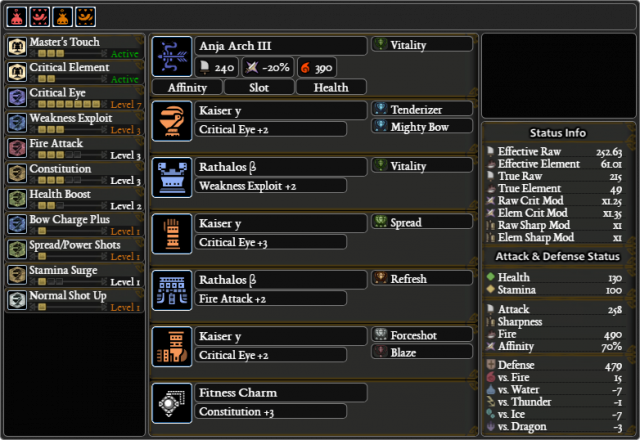
- Bow, as always is a high risk, high reward weapon. If you weren’t a glass cannon already, you are now. Health Boost 3 is mandatory, running Anja bow is recommended as you can slot for it easier. Great for KOs and damage up time thanks to its range, just be warned that carting to Jagras harassment is very likely. KOconuts is powerful thanks to it not moving much, just bring impact mantle to make it easier. If you use Dragon Piercer against Leshen, don’t be surprised if you’re kicked or carted from hunt or session.
- Light Bowgun, flame ammo isn’t actually terrible and has more range than using normal. Don’t bother with pierce because of small hitzones and spread ammo is risky business without the ability to guard. Luna Blaze is recommended as it can fire paralysis, poison and recovery ammo, the bonus built in Guts skill and ability to shoot demon ammo for burst damage improvement when Leshy is down is just icing on the cake. Wyvern mines for Jagras clearing, and because of flame ammo’s range, you’re relatively safe compared to using bow. Health Boost 3 for this too.
- Heavy Bowgun, if you have Glutton just go Gun-Tank, swapping for Luna Ruin if don’t have it. Don’t bother with using it for CC chaining, thresholds are high enough that it’s not viable and is not a good return on investment to try and paralysis/KO chaining. Also, it’s immune to sleep. Small body makes clusters a bad option, but great for Jagras clearing as is Wyvern ammo. Otherwise, not recommended. Also Guard Up is mandatory due to pin, and make sure to snap your aim to the origin of the attack due to HBG’s low guard angle.
If it’s not clear, paralysis is incredibly useful against Leshen, as it stops it from teleporting and makes dealing with the Jagras a lot easier. Getting mounts just adds to your damage uptime, and if possible time your paralysis or KOs after it. If you’re playing Longsword make sure to show your appreciations for said downs, you’ll understand whenever you try to use anime slash Helmbreaker and Leshy teleports out of the way (you’ve no idea how times I’ve whiffed because of it, on top of its small body).
Because of how hard and fast Leshy will attack, Mega Potions aren’t ideal, unless you’re packing Speed Eating 2/3, due to attack frequency and layout of Ancient Forest. Your very likely to not drink it fast enough if you’re in the thick of it. Bring max potions and lifepowders, and materials to craft more on the fly (restocking between transitions). This is incredibly important because there will be times other Hunters can’t heal themselves and with how damaging attacks are, if someone’s eaten for Moxie they will most likely be under the threshold to activate it. Max Potions being rather self explanatory providing quicker heals. Flash pods are vital to certain aspects of the fight. Staggering the Jagras pack, stopping the Revolture-nova and freeing from root cage, and flashing Leshy out of the attacks. Personally, the Revolture-nova it should only be flashed if your squad is in a dangerous position as it will reset its murder of Revoltures shield (that can block arrows from testing) and stopping its chip aura until it rebuilds.
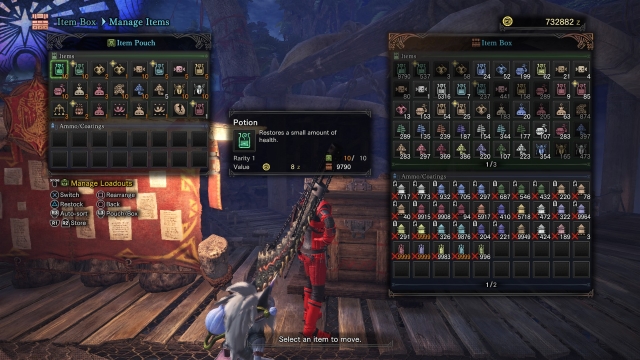

This is my typical radial menu set up and what items I bring, of course you can adjust it. But for reference, lifepowders and materials is mandatory, even with a support healer because wide range only works so fast. Igni stone isn’t required in your inventory to use emote, but I bring it nonetheless just to check on charge time easier, as emote doesn’t show charge time. Also, if it’s not obvious, the emote can free people from the roots. The Igni stagger only works when its mid root attack or idle animation, from what I’ve seen and heard, but generally speaking just use to it burn roots/Revolture and free others.
Dealing with Ancient Leshen’s new form:
There are four main things to deal with: its roots, birds, Jagras, and teleports.
Covering its roots, they will be the most dangerous things to watch for. There are five different root attacks in total and dealing with each of them is incredibly hard. Caution is advised whenever it hits the floor and giving it room will tell what it’s about to do. Two of its attacks are area attacks casted from its position and will either spray out in one or three waves. If its body shudders when punching the ground that’s the three wave one and you will need to be four/five rolls away from the centre to avoid it (superman diving is advised for this if you’re unable to block/avoid it). Then there are three other root attacks that will track and aim towards a target. One will split into two root lanes and curve around. This will have one main target, but will go in a ∝ shape. However, this isn’t always the case and rolling perpendicular to it is the safest option (assuming you can see where it’s going/targeting). Then there are the two that will mostly cause you to cart. The warnings for these are slightly harder, so you will have to pay attention to the ground you’re standing on. If roots appear underneath you, explosion of roots will form like the normal Leshen’s attack. The caveat being that it can form three sequential explosions if there are less than four Hunters. Otherwise, the biggest killer is the root cage attack which has a slightly longer delay. Shout outs are key for this as is team coordination, as carting is imminent like an Eva’s five minute countdown, except in five seconds from the Jagras/Revolture murder. Just because it bears repeating, this attack can be foresighted but requires later timing as the initial roots unearthing will activate counter, making you vulnerable to the follow up that will cage. As for guarding, Guard Up is required and you will have to reposition to guard in its direction. Otherwise hope someone’s on point with the flash/Igni and lifepowders in case you’re that low as chip damage will devour your health like a pack of pigeons with a piece of bread.
Revolture aura can block shots if they’re not piercing and don’t you dare use dragon piercer on it bow users. Igni can thin the aura, most noticeable when its more Revolture than tree. There are two main Revolture attacks: a large and small swarm. The large swarm is high damage and will go through some of the terrain, which will activate temporal mantle fortunately. The small swarm is a “small” quick burst of Revoltures that will fly towards its target. This can be single or triple lanes and won’t activate your temporal mantle. Luckily, the damage is low. The single Revolture wall is self explanatory and somewhat easy to roll through, just make sure you roll towards it if you’re centred to it. But for the triple shot, rolling through it directly is the best method as dodging to the side may result in being hit by the other murder.
Jagras pack is luckily the simplest, someone will be targeted and be focused on by Leshy too. When this happens the easiest thing to do is flash and kill them ASAP. The Jagras aren’t something to ignore and will stun lock if you’re not careful. Not to mention that their lunge attack is heavy knockback and deals enough damage that you’d best weary of them. Two mega barrel bombs should be enough, but be warned that if Leshen has no parts broken you will need to whack them a bit as they have at least 500HP. Also, whenever the handler says its attacks have grown stronger it will revert back to original pre-broken strength. Staggering it down will make said ability weaker, the head break will halve the Jagras population summoned. But this isn’t an easy feat. Also, paralysis weapons can be substituted for flashing as their thresholds are low and the bodies can be exploited for building gauge/phials for weapons like Longsword, Charge Blade, and Switch Axe. Also, during this phase Leshy will perform the root cage so be prepared to flash/Igni.
Finally, the teleporting. When Leshy start does it there’s a lot situations and different things it’ll do that it’s hard to really run through them all. That said, there are things that can be learned and it’s got three main attacks: roots, birds, and swipe. Whenever it starts to teleport spam, prepare to be harassed as it’ll make like Slenderman and be right behind you. The birds and roots is self explanatory with what I’ve covered already, but for claws it’ll either do these three attacks: fake out roots, double swipe, and bear hug. Fake out roots is one that’ll catch most people out as it’s the fastest and will send you flying, best method is rolling forward if not blocking/countering. And it’s the opposite for the double claw swipe, just rolling through it as Leshy’s targeting is luckily very lenient on the follow up. As for the bear hug, roll away from it again. If you’ve fought Arzuros from previous games, you’ll understand how to dodge these attacks quite easily.
Tips and Tricks: TLDR
A quick run down to end all of the info just covered and some extras:
- Flashing is your friend, but don’t over flash as it will just spam teleport and harass with that, nor will it not stop it from teleporting. Treat it as over flashing as it can just teleport once flash spammed.
- Staggering out of a teleport is incredibly difficult and you’re better off using its red pods to stagger it out of more dangerous attacks i.e: root wave explosion.
- Freeing someone from root cage can be done by flashing Ancient Leshen or using Igni on roots.
- It is immune to sleep, but is relatively weak to paralysis and has “low” thresholds. Poison can be a great side damage and using poison bombs will add up. Don’t bother using blast and getting KOs is hard to perform using hammer.
- Weapons for paralysis should be SnS, DBs, Hammer, SA, IG, LBG, HBG. Slotting bow for para coatings is not advised due to damage loss. Recommended for phase 3 and 4 as that’s when it’s most prone to teleport spam and times to cart.
- Abuse using mount attacks is key to making the hunt a lot easier, weapons like GS, LS, SnS, Hammer, Lance, and IG can speed up this process. Ledges are your friend in this case. Glider mantle if you’re struggling.
- Most recommended Hunter Tool: health booster + temporal mantle. Rocksteady is second recommendation due to Jagras pack will make you just take all of the damage. Evasion mantle makes dodging things easier. Glider mantle, see previous. Vitality is just a safe bet but compared to utility of temporal and health booster, it’s at the bottom.
- When Ancient Leshen is walking slowly to someone, lead it close to a ledge for spamming jump attacks.
- When mounted, Ancient Leshen will perform triple root attack, flash it to stop it from doing so. Be warned, it will still do swipe attacks.
- Bring lifepowders and extra materials to craft them mid hunt, with the obvious being restock between transitions.
- Ancient Leshen will always start at area 12 and will either transition to 8 (then 7, 6) or 5, this will go to 4 and end at either 1 or 2. At the time of writing, it’s theorised that going to 8 is timed based, but ending at 1 or 2 is unknown.
- A dedicated healer will make this hunt a lot easier due to chip damage, and having Recovery-Up 3 on your build with health will make those instances less dangerous. On top of Health Boost 2 or 3 for max health of 180/200.

GameGrin are proud to have all their articles researched, written, and edited by real people that care about gaming.


COMMENTS