
Dark Souls - All Things Combat
Welcome back to the Dark Souls Rundown! Today we’re talking about combat. Nearly all of the people I’ve talked to that told me they “couldn’t get into Dark Souls” blame it on how difficult the combat was. Like many Souls veterans, I simply scoff at this idea. Not because I’m better than them or due to any sense of superiority, but because I know that once you understand the mechanics that make up each encounter in Dark Souls, any competent gamer could make their way through the game. With that said, let’s start with the basics then work our way up to the more complex and even hidden mechanics.

Back to Basics
Where to Start?
Since it would feel wrong to start anywhere else, I’ll mention that all of the actual controls can be found within messages strewn across the floor of the very beginning of the game. Also, I’m not going to be talking about glitches, exploits or other techniques mainly used in PVP because I don’t even understand them all well enough to explain them. As I’m more interested in explaining the mechanics that govern combat, we’ll be skipping this and focusing on the various pieces of information that will help you become a master in warfare.
Before being able to easily dispatch the countless hollows, beasts and demons you’ll face within Lordran, an understanding of the importance of weapon choice is necessary. While the player can choose to use their unarmed fists as their weapon of choice, it is highly advised to actually equip something sharper or heavier in one of the four weapon slots. While four may seem like overkill, it’s only because there are two for the right hand and two for the left. Unlike many other titles out there, Dark Souls allows the player to choose which slot will hold which ‘weapon’.
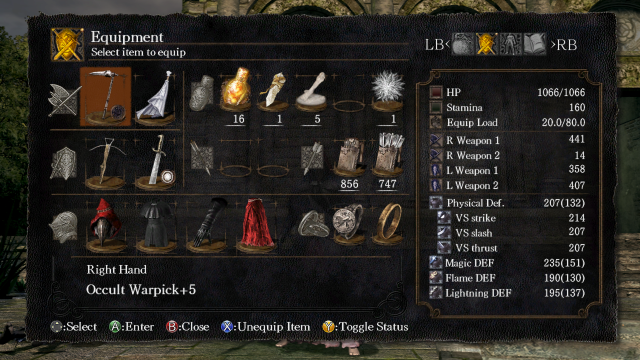
I say ‘weapon’ because that is what the game calls it but in truth, these slots can be used for typical weapons (i.e. swords, hammers, axes, bows, etc.), shields of varying sizes or any spell tools (catalysts, talismans and pyromancy flames). You may be wondering about the usefulness of putting a weapon in the offhand if a shield is available or maybe why you would put a shield in your main hand. Simply put: because you can. Also, certain equipment has special attacks and properties in different hands, but more on that later. In the meantime, let’s talk about how to decide which weapon you want to use.
What All Those Numbers Mean
You may already be saying “I know I want to use a bigass sword!” and that’s totally acceptable. My question is: do you want to use a Greatsword or and Ultra Greatsword? What about the Attack Type and how it defines the moves available to you while using your bigass sword? How about what type of damage it does, what Parameter Bonuses it gets, Auxiliary Effects, Durability and Weight? While this seems like a lot to concern yourself with, nearly all of these values simply help you find the perfect match for your playstyle. Using the screenshot below, we can quickly run through everything you could want to know about any physical weapon.
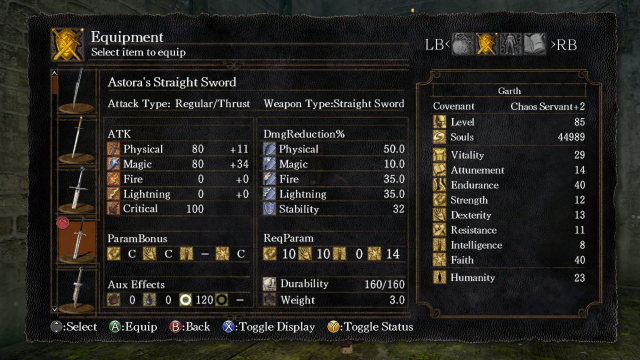
Very top, we have the weapon’s name: Astora’s Straight Sword. Next line down is Attack Type, which gives us an idea of what kind of attacks we can expect out of this sword. In this case, our character will have Regular (basic swings) and Thrust (stabbing attacks) style moves. To the right of Attack Type is Weapon Type, which just tells us… well… what type of weapon it is. This is more useful with weapons that have misleading or uninformative names like the Warpick, which is considered a Hammer.
Damage and How You’ll Deal it
Moving on, the table below ATK has all the info we need about what kind of damage our weapon will do when it connects with an enemy (or friend, shopkeeper, blacksmith). Skipping ahead for a moment, Critical is how much extra damage a weapon does when performing a backstab, riposte , or plunging and is only ever higher than 100 on daggers and thrusting swords. In our example, the ASS (hehe) does a base value of 80 Physical and Magic damage with an additional 11 and 34, respectively. These additional values come from the weapon’s ParamBonus’. To make this easier to understand, I am going to roll ReqParam (Required Parameters) into my explanation. ReqParam is what Strength, Dexterity, Intelligence and/or Faith is required to successfully wield a weapon while the ParamBonus is how well a weapon’s bonus damage scales with those four attributes (the higher the attribute, the higher the damage).
Back to our example screen, the ASS requires 10 Strength (to hold/swing properly), 10 Dexterity (to swing/combo properly), 0 Intelligence and 14 Faith to wield it one-handed. While the Strength requirement can be reduced by two-handing the weapon (down to 7 from 10), our character must still have the required Dexterity to get the full base Physical damage and the required Faith to get the full base Magic damage. With all the required attributes, we can now look at ParamBonus, which in this case has C scaling on Strength, Dexterity and Faith. These bonuses go from E (worst) to S (best) and give more of an idea of the extra damage instead of an exact amount. This is because on weapon with S scaling might have slightly (very slightly) better scaling than another weapon with S scaling. Either way, with three C’s, the ASS gets a nice little bonus to both of its damage types.
Not the Intended Purpose
Above ReqParam, we have DmgReduction% (or how much percentage of a damage type our weapon will reduce when struck). These values are more impressive on shields, but if we chose to wield the ASS in our left hand and use it to block, it would reduce Physical damage by 50%, Magic by 10%, Fire by 35% and Lightning by 35%. Since we’ll talk more about this with shields, I simply want to say that Stability tells us how much Stamina will be lost when we block with this weapon. Think of it this way, the higher the Stability then the less Stamina you will lose if you block an attack.

Extra Stuff
At the bottom we have AuxEffects, or effects that aren’t quite the same as normal damage. From left to right, there is Bleed, Poison, Divine and Occult. There is also a Toxic AuxEffect that only shows up on a few weapons. While these all work differently, all we need to know right now is that these values are set on any weapon they show up on and can’t be changed. For the sake of our example, the ASS does divine damage that is useful against the undead and skeletons in particular. Finally, we have Durability and Weight. Simplest values on the whole screen, Durability tells you how many points of Durability the weapon has before it breaks and Weight is how heavy a weapon is.
As a side note: all bow types and spell tools have the additional values for ShotRange or MagAdjust, respectively. The higher the ShotRange, the further the bow, crossbow or greatbow can shoot while still dealing full damage. The higher the MagAdjust, the more bonus damage the spell tool gets from Intelligence or Faith.
With ALL of that out of the way, any player can make an educated decision on which sharp stick or heavy bludgeon they’ll use to murder some undead.
I Have a Weapon, Can I Kill Something Now?
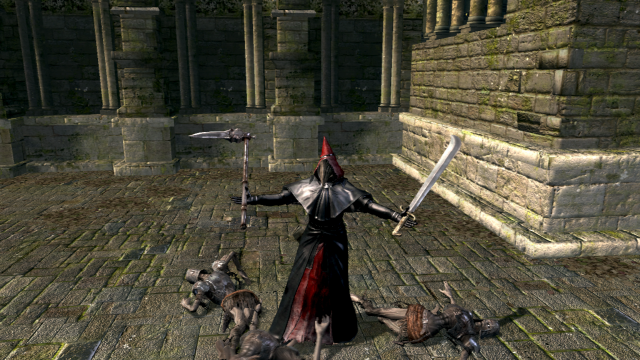
To be perfectly honest, there isn’t much complexity when it comes to fighting any given enemy. There are plenty of mechanics and values you can completely ignore if you just want to smash the “bad guy”. You have the ability to attack, strong attack, jump attack, kick, dash, backstep, roll, target lock, change weapons, two hand, block, parry and a few other things. Several of these techniques will become more or less useful depending on weapon and armor choice. Many players don’t make use of the unique moves that happen after a backstep or roll but always lock onto their target immediately while others choose to do the opposite.
When it comes to bows and crossbows, there are a few features that make them tricky (or straight up painful) to use in normal combat situations. For bows, you must stand still to pull the arrow back and fire, leaving you completely open while you perform the entire action. With crossbows, you are completely unable to aim in first person, making precision shooting impossible. This leaves bows as the only way to fight at any kind of range since there aren’t any highly accurate magic attacks either. In fact, most Miracles are extremely close range or aren’t even offensive. Pyromancies all have either an “in your face” burst or an arcing projectile that drops off quickly. Leaving Sorceries as the only offensive magic that has the range to hit a target at a distance. The issue is that free aiming Sorceries is extremely difficult and unreliable.
Although you have a lot of options, you can quickly get into a pattern of how you prefer to deal with any particular enemy. See a guy with a shield? Maybe you’ll decide to kick his shield before smacking him or overwhelm him with a jumping attack. See an enemy you know how to parry? Wait for them to attack, parry their weapon out of the way and bask in that glorious riposte. Dark Souls is a game of choice and veteran players know this very well. Whether you’re using the tried and true sword-and-board, a spell slinging build or some whacky dual-wielding setup, there is always something new to experiment with using the most basic controls.
Let’s Get Technical
Weaknesses and You
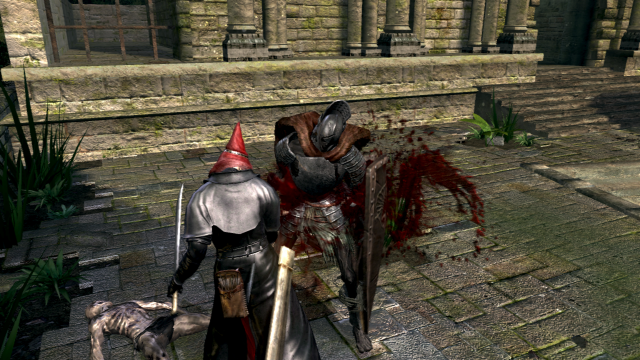
Now I’d like to talk about the more technical side of combat that involves enemy weaknesses and how to make yourself more difficult to kill. Instead of going into which “bad guys” are weak to which damage type, I will simply say that there is at least one enemy weak to each way you can cause damage. A few examples include: man serpents and thrust damage, hollows and fire damage and, of course, skeletons and divine damage. Knowing about these weaknesses can easily turn a battle in your favor (as it isn’t that hard to find a way to deal any particular type of damage). Although, if you’re not careful, you may face off against an enemy that uses a damage type that you’re not prepared for.
Protect Yourself Before You Pro-Wreck Yourself
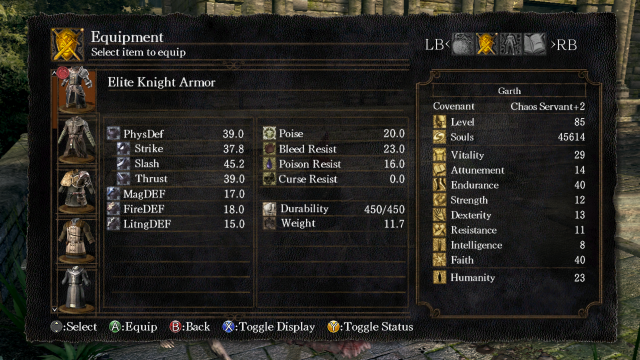
Every piece of armor found in Lordran has defensive stats that should be considered when building up your character. There is a value for overall Physical defense as well as the individual Strike, Slash, and Thrust defenses and the Elemental defenses (Magic, Fire and Lightning). Alongside these are Resistances to Bleed, Poison and Curse build-up. There is also Durability and Weight that work exactly the same as before. Finally, there’s Poise (a stat only found on armor). Poise is your resistance to being smacked around and/or out of animations. The higher your Poise is, the less likely you are of being stopped mid-Estus chug. Bear in mind that Poise is most abundant on heavier armors and will require certain playstyle changes if it causes your character to become too heavy.
Rawl! Rawl! Rawl!
Earlier I mentioned that you have the ability to perform a roll maneuver. This is meant to be used to avoid incoming damage but is only available in four directions. More importantly, rolling requires the player’s Equip Load to be under certain percentages if they wish to perform faster and more effective types of rolls. Essentially, there are two basic ways to deal with enemy attacks: roll through them or face them. When you don’t have anything equipped then you will roll the fastest and furthest. Once you’ve got a small amount of equipment on, you will have the same animation as before (but it will be slightly slower and not take you as far). If you have big, heavy armor on, you will either roll much slower or just fall over and stand up again. These animations have less iframes (invincibility frames) and make trading damage or blocking it far more desirable.
All Praise the Shield
As mentioned above, you can block attacks with most weapons, however, shields are always your best option. There are three types of shields: Shields, Small Shields and Greatshields. Greatshields are the best for blocking incoming attacks with the highest defenses stats and Stability, however they are heavy as hell and require equally heavy attribute investment. Shields are the most well-rounded (hehe) with decent defensive stats (often boasting 100% Physical defense) and manageable Weight. Small Shields have the lowest defensive qualities but are lighter and some even make parrying easier.
It’s Rih-Pahst, Not Ree-Post
If you can get the timing down, parrying is one of the most useful techniques in Dark Souls as it allows you to perform the almighty riposte. Much like a backstab, which can be performed anytime you’re squarely behind a susceptible enemy, a riposte will do extra critical damage when properly executed. While performing either a backstab or a riposte is not that difficult by themselves, it’s the positioning and parrying that makes each technique tricky. Normal Shields all have the same parry animation and timing while certain Small Shields have a wider opening that allows the player to be less precise. Some weapons can actually perform a parry if held in the offhand.
Are You Ambidextrous?
Any weapon can be placed in the left hand, but only a handful (get it?) have special animations or moves while there. My favorite example is the Falchion. When it’s placed in the left hand, its attack isn’t replaced with a block and remains a side chop and then its strong attack becomes a twirling parry. Honestly, there’s no feeling quite like stopping an enemy dead in their tracks with a flick of your wrist before utterly destroying them. Besides parrying, certain offhand weapons get new attacks such as the Gold Tracer and its infamous tri-hit combo attack. With that said, maybe you’re more interested in using brute force and want to cause the most damage with the least effort. In that case, two-handing is for you.
Two Hands are Better Than One
This last little technique is probably the most used as it is the easiest to use properly. When wielding any weapon in your main hand, you can choose to hold it in both with the press of a button. You’ll quickly notice that your weapon has a new move set and is probably doing more damage. The move set should be self-explanatory, but the increased damage actually comes from the fact that two-handing your weapon multiplies your Strength by a time and a half. Due to this, in certain situations, you can actually wield weapons with a higher Strength requirement when two-handing them. For instance, if a weapon required 12 Strength and you only had 8, you could still two-hand it until you raised the attribute.
That does it for the basics and the more technical stuff. Finally, I’d like to take a look at the mechanics that aren’t made clear with numbers or even in-game explanations.
Obscure Bits
While some of these will seem obvious, here are a few mechanics that will surely help you throughout your time in Dark Souls.
This first one is super simple: Headshot. If you shoot an enemy in the head, you deal bonus damage and Stagger them for a short time, leaving them vulnerable to other attacks.
Next up we’ve got Stagger, which is a state in which a character is reeling back, can’t do anything and takes an additional 40% damage from any attack.
This bonus damage can be really helpful if you’re attempting to perform an Overkill. Overkills happen when a player deals 150% of an enemy’s total health in one hit. This results in the enemy giving out 20% more souls upon death.
Another easy way to get bonus damage is from Counter damage. This is a special type of bonus damage that only occurs when you hit an enemy while they’re trying to hit you. Thrusting attacks make this 20% boost happen fairly often, especially from behind a Shield.
If you plan on using Shields a lot, it may be worth noting that they have a hidden stat called Deflection. This stat comes in three levels: light, medium and heavy. The rule of thumb is that the bigger the Shield is (type, not actual size), the higher its Deflection. As for what it does, if your Deflection stat is higher than your enemies ability to bypass it, they will bounce off and be left Staggered.
Finally, if you ever get grabbed by an enemy and are forced to sit idly as your character goes through an animation in which they take damage, you can make use of the Grab Damage Reduction mechanic. When grabbed, begin pressing the shoulder and face buttons as fast as you can to reduce, or even negate, the damage an enemy’s grab would cause.
And that’s it. I know this is a long read, but I hope you learned something if you made it this far. Having knowledge like this at your disposal should make just about any encounter seem much more manageable. As I said in the beginning, there are plenty of PVP-centric techniques that are available to learn, but I’m not writing this series for PVP. With this series, I want to help people enjoy my favorite game the way I do. But if PVP is more your thing, I’ve got a double feature of Dark Souls YouTubers for you today.
While not active within the last year, Peeve Peeverson has some very impressive (and often hilarious) content on his channel. Personally I can never think of Peeve without thinking of Oroboro the Ninja, the creator of one of the most meta builds ever (damn you, Darkmoon Falchion!). Unlike Peeve, Oroboro is still active and put up a video about a week ago. Both of these guys have a bunch of PVP and PVE content to watch and make some of the best commentary. Speaking of PVE… The next two pieces will be covering the Age of Fire and are looking like they will be quite expansive.
Until then, Praise the Sun and Vereor Nox.

GameGrin are proud to have all their articles researched, written, and edited by real people that care about gaming.


COMMENTS