Monster Hunter World Top 5 Sword and Shields
With Monster Hunter: World coming to PC, I thought I’d take the time to showcase some top weapons to build for. May the streamstones ever be in your favour. But really, with a little bit of thinking and Athena’s ASS (Armor Skill Search), you too can have equipment to chase for. In this list, I’ll feature three weapons that were part of initial launch, with the last two being event or DLC dropped weapons post-launch. A quick note, the values I list here are the raw weapon values. The ones you see in-game are often referred as bloated values, factoring the motion value or the “power” behind each attack. Also, it makes it a lot easier maths wise to compare the raw over the bloat values.
A weapon I’m sure is overlooked much like Hunting Horn, people probably think Sword and Shield (often referred as SnS) as the “beginner” weapon. That’s not quite true, at the hands of a skilled player they’re able to keep up a devastating onslaught, constantly repositioning, the need to dodge roll and ability to use items with the weapon sheath is probably more dangerous than a Greatsword with its uptime. Throw in the Shoryuken like shield jump attack, and you’ll build up a devastating mount attack that can KO Monsters. Truly the Swiss army knife of Monster Hunter weapons.
Teostra’s Emblem - 190 Raw + 240 Blast
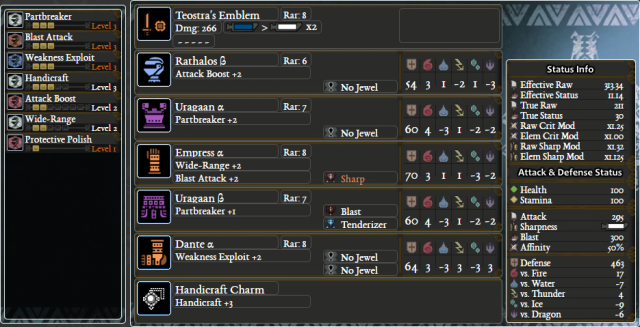
Easy to get Wide-Range 5 or more survivability skills against Tempered Monsters
The king of blast is at it again, and this time has an incredible weapon to boot. Whilst Blast isn’t as great as it used to be previous games, or even the highest which goes to fluff bat Paolumu for some reason. But besides that, Teostra’s Emblem has arguably the best design, aside from Legiana who definitely has the most style but the weak raw and Monsters that are weak to Ice are very few and far between. That said, whilst Kulve Taroth’s variant makes Legia Rimespire a better pick, its 160 raw isn’t super great since SnS is a weapon that likes a balance of Raw and Element, but you can make an argument over it being stronger than Teo’s in edge cases. But that’s not really why it’s here, it’s here for the Blast.
Now whilst I’ve seen stirring that Blast only applies on non-broken Monster parts. That does require a lot of testing to know if that’s true or not, although 4 Blast Dual Blades against Radobaan might beg to differ. This Teostra’s Emblem set is designed to destroy and break as many parts as possible. With Partbreaker 3, Blast 3, and boosted attack, it still has four Lv1 and a Lv3 slot to play with. This a nice SnS build, the only downside is the need for Dante’s legs and Lunastra’s Alpha arms meaning acquiring this isn’t that easy. But honestly, it’s a blast to play around with and the need of only a Blast and Tenderizer Jewel helps make this a relatively easy set to build. Although, your luck may vary (250hrs for that one decoration).
Barroth Club III - 210 Raw + (180 Paralysis)
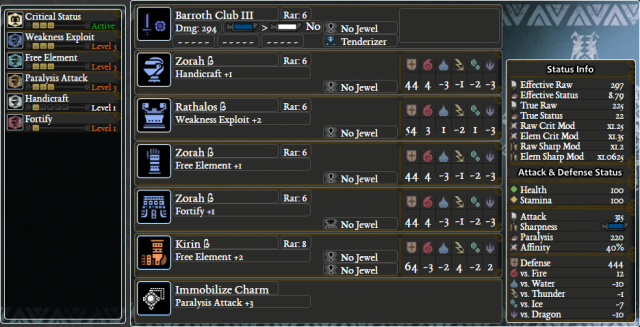
Slot to your hearts content.
Okay, now here’s something that’s easier to make and more accessible to use. As you can guess, this is a set designed to lock and hold the Monster down. Great for solo, better for multiplayer. With the only need being the Tenderizer Jewel, this set boasts seven Lv1 slots. If you’re a very lucky person, you can fully max out for Attack 7, or even Wide Range 5 and Speed Eating 2 for added support factors. An alternative though is packing Critical Eye 7 for an additional 30% affinity, raising it to a net positive of 20% or 40% affinity if fully augmented for affinity. Throw in the Zorah armour set bonus of Status Crit, this makes your proc rate at 90% with Weakness Exploit 3. Your chances of hitting harder just improved with Paralysis kicking in more often, assuming the high 210 raw hasn’t already slain the monster. However, that’s not to say this isn’t the only Para SnS to look at.
When theorycrafting for a solid Para SnS, the Grand Barong was a close contender. Boasting 300 Paralysis and 0 affinity but 20 less raw, it was difficult to tell what would be better. But the lack of a slot lv2 for that one Tenderizer Jewel to get Weakness Exploit 3 isn’t a compelling choice. Plus, the extra Paralysis isn’t going to set the world on fire. Against most Monsters, your ability to proc Paralysis will range between two to three hunts. With Grand Barong’s additional 120 Paralysis is maybe going to push it to four, but the hunt should be theoretically done by then. That said, the drop in 20 raw for a possible base boost of 10 more affinity isn’t a long term good trade off. Especially without Critical Boost to raise the extra damage to 1.4 times, meaning the net damage gain isn’t as high. Possibly the final nail in the coffin is the Apothecary mantle, and with the previous build Monster parts should be dropping left right and centre. With Paralysis, as you proc it more so to does the Monster’s resistance to it. Assuming you wear mantle after the first or second paralysis, the slightly high raw will make up for the lower Paralysis.
Jagras Garotte III - 190 Raw + (360 Water)
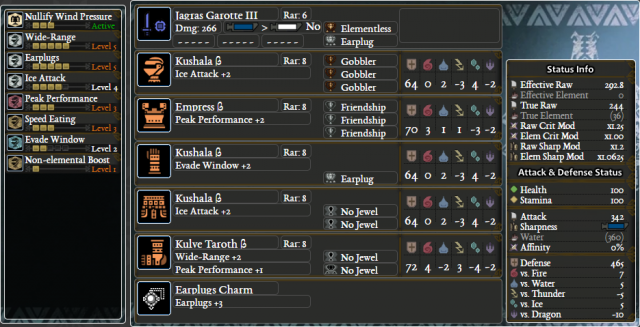
A stealth build for Legia Rimespire if you're interested, solid against Lunastra.
But what if you want more a more dedicated item support/healer build that still keeps that solid damage up? I give you yet another Great Jagras weapon build with its SnS variant. Boasting Earplugs 5 and Null Wind thanks to Kushala’s armour set bonus, you won’t have to worry about the Monster somehow stopping you mid item use. But let’s throw in Speed Eating 3 just keep you attacking for longer, and less time trying to heal with the Wide Range 5 healing everyone in range. If you haven’t guessed the ability to heal others is a god send, especially for Tempered and Arch-Tempered hunts assuming they can take a hit or two. Being a fully dedicated healer set with little to no obstructions, the Non Elemental Boost just helps raise this build further. Being a zero affinity build, you can easily augment it for another 10 raw and a health augment to keep yourself in the fight for longer. But being able to max its raw to 205 will raise your weapon’s Non Elemental Boost to 225, a hefty 20 raw boost. However, maintaining the Peak Performance skill will be more difficult. But the extra three Lv1 and one Lv2 slot can make some interesting builds, throw in Mushroomancer (possibly maxed out) and Free Meal for longer sustain. Although having Mushroomancer 3 is a very situational build since unless you wanted the dash juice buff to be up for the stamina freaks, you can easily stick to Mushroomancer 1 since 2 is redundant compared to chugging Mega Demondrug and Armorskin.
However, should you wish to twist its build a bit, simply replacing the weapon for the Barroth version is easily feasible for gaining an additional 20 raw, with the ability to augment for 10 raw and zero affinity (although you will need to drop the two Earplug jewels). But the extra damage can justify it based on the Monster like Anjanath who only needs Earplugs 3 to plug his snotty roars. Throw in the extra slots, you easily add in some defensive decorations like Divine Blessing, Elemental/Debuff Resistance for certain Monsters. And for the lucky, just more Attack Jewels. Overall, a pretty top tier set with a nice balance of skills to support and damage.
Fatal bite - 220 Raw + 210 Dragon
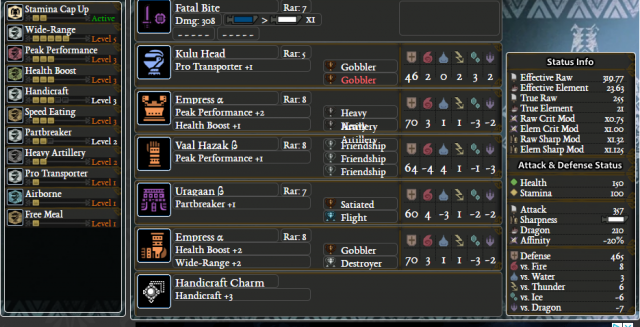
Not optimal, but I had to include Kula somehow.
My personal go to set for Kulve Taroth sieges, that I’ve dubbed the “Hungry Bird build”. It’s my main build due for its flexibility and Kulu Ya Ku head usage. Whilst I could be running my Jagras build for her, you can easily tweak this to add extra damage by replacing two of the Medicine Jewels for two Destroyer Jewels. This then allows you to replace the charm for Handicraft 3, giving you a nice juicy white bar. Although, something I’ve opted to do is drop a Medicine Jewel for Airborne for Kulve specifically. Giving an additional 10%, there are multiple areas in the map that allow you to leap off the wall performing an Triangle+Circle/Y+B attack towards it (a bit of camera fiddling may be needed to align correctly). This is a strong attack for getting mount attacks that will bring Kulve down and get that important head break. From my personal runs and rotations, you should be able to get 3-4 mounts in total. One in Phase 2 and the rest in Phase 4.
The skills here are just to help keep your uptime in the fight, and your team importantly. Every now and again I’ll switch a Medicine for Free Meal, but personally once I get my two Destroyer jewels I’ll remove Free Meal. But really this build is more designed for Kulve, and more importantly using Kulu-Ya-ku Head for that extra fun factor. But this a build that can also be used for Zorah Magdalos since you’ll be lugging cannonballs a lot in that and Kulve Phase 1.
Taroth Slicer "Tar" - 190 Raw + 210 Sleep
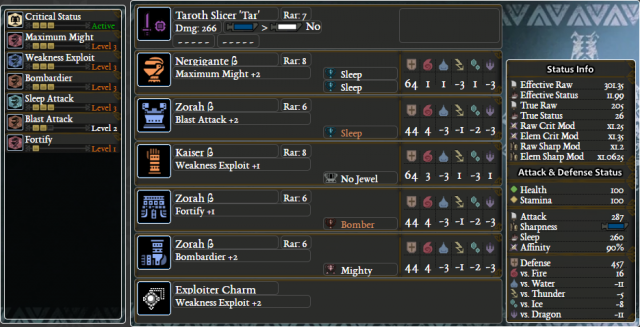
Only way to optimise this is with better Zorah pieces, luckily AT Zorah zoon.
Another Zorah Crit Status build with Radobaan’s Kulve Taroth variant weapon, but one for the gimmicks. Much like my Greatsword Sleep and Runner build, this one is based on bomb running a Monster to death. Great for players who can’t handle Monsters like Kirin or insert your Monster bane here. The main reason I’m opting for the Kulve variant is the extra 10 affinity. If you choose to fully augment it for affinity that’ll raise it to 25% compared to the 20% affinity from the original Baan Claw III when augmented for three affinity augments. The extra 10 defence is just a cherry on the top. But the extra 5% isn’t that make or break, it’s just peaking the Sleep critical rate to three in four hits with Weakness Exploit 3. It’s the ability to augment for one affinity and health or power at your choosing. This is because the Maximum Might 3 will push you to 100% crit rate.
Like the Barroth SnS build, wearing the Apothecary Mantle after the first or second sleep is ideal as that’s when the resistance will start to build up to nearly dud levels of useless sleeplessness levels. Bombardier 3 pushes the Barrel Bombs to highest damage, and if you’re running as a group it’s whoever triggers the explosion that’ll apply the damage boost. Best part yet is that the decoration front isn’t that difficult, there’s no need for an insane luck grind for anything too rare. And if you wanted to, you switch the Teostra arms from Alpha to Beta if you want that Lv3 slot for whatever you want. The extra slots are a plus, so it’s up to you how you want to play it. But an option is to use extra slots for Critical Eye levels to allow you to push the weapon’s raw more, so the ability to adjust the build is nice.
These are by no means the best builds, and that’s just because of how versatile SnS is for adjusting between damage and support. Fully pushing these limits is the fun of SnS, aside from the ability to just about do everything all of the other weapons can do. Plus it helps I was able to make a nice mix of varying difficulty sets, that’s always nice. Happy Hunting Hunters.

GameGrin are proud to have all their articles researched, written, and edited by real people that care about gaming.


COMMENTS